


Buying fancy pre-terminated speaker wire comes with a couple of issues. For one, it can be difficult to get the exact length you want. Often times manufactures will offer only a few lengths and you are stuck having to tie up and hide the excess cable. Second, they are usually expensive, either from exotic marketing hype or because you need to purchase a longer then desired length. Here are some quick easy steps to making your own well dressed speaker cables.
Determine the amount of cable you will need for all speakers. This may sound basic, but with cables going up, down and, side to side, it can be easy to miss judge the length you need. I recommend using some string or even an existing cable to get a precise measure. Start with your longest run first! I cannot stress how valuable that statement is. Starting with the speaker that requires the most wire will help keep your waste to a minimum. If you under estimated your total required speaker wire length, you can easily purchase a few feet for the center channel. Running speaker cable to the front speakers first may leave you with a 20 foot section of speaker wire for a rear speaker that is 25 feet away!
Once you have determined your proper speaker wire length, we will want to prep the cable. In this example I will be using KnuKonceptz KL3 series in wall speaker wire. This speaker cable is UL listed and rated for CL2/CL3 applications, meaning it is suitable for home audio or commercial audio installations where the cable has to pass through a wall or ceiling. To give this cable a finished look, speaker pants and banana plugs will be used on each end.
The KL3 speaker wire has a double wall jacket. Having a double jacket is part of the UL rating that makes this cable usable in wall. The jacket is flame resistant and helps protect the speaker wire from damage will being pulled through studs during installation. For my project, I will not be installing this cable in wall. If you are installing this cable in wall, terminate the cable AFTER you have run the cable through your studs.
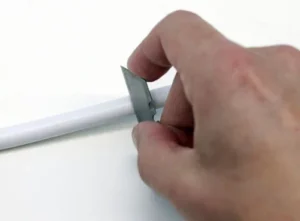
To install the speaker pants, I need to remove this main outer jacket. I removed 5-1/2″ of the jacket to expose the inner red and black insulated conductors. Using a razor blade, I rolled the cable on a flat surface holding the blade in one place. You do not need to apply a lot of pressure. The idea is to not damage the inner insulation of the cable. After scoring the speaker wire PVC jacket, I bend the area I just scored with the blade. Working the PVC jacket back and forth, the outer jacket will start to break apart. Additional light pressure on some parts of the seam maybe required.


Once apart, the KL3 series cable will have some white powder inside. This powder is a release agent that keeps the inner PVC jacket from sticking to the outer jacket. The powder will come in handy so do not remove it all as it will help lubricate the legs of the pants. Insert speaker wire into the pant, wiggling the cable left and right so that each conductor finds its way through the base of the pant and into the pant legs. Depending on the brand of speaker wire you are using, you may want to use some cable lubricant. Cable lube is used by electricians when pulling cable through conduit and can be found at a local home improvement store. Lightwieght oil can also be used.


Now that speaker cable is through the legs, you will want to trim the length of the exposed conductor to fit your connector. Using the KnuKonceptz eKs-BP2 banana plug I size up how much I need to trim off of my exposed speaker wire. After trimming and stripping the individual conductor, I am ready to tighten the connector in place and finish the assembly process by screwing the banana plug’s outer cover into place.


This process should take 5-10 minutes per end and is a great way to complement your home stereo installation. To add another touch of personalization, you can add a nylon mesh over the speaker cable. These products are available in a wide variety of colors and patterns, making your cable even blend into the rooms environment and unique.
